

Augmented Reality production can be achieved by combining Unity software with the Vuforia extension. Read the tutorial below to learn how:
Setting Up the Unity Editor:
Unity Editor
After starting a new project, the editor screen opens, providing the editing tools.
- Click on File and go to Build Settings, or use the shortcut "ctrl+shift+b".
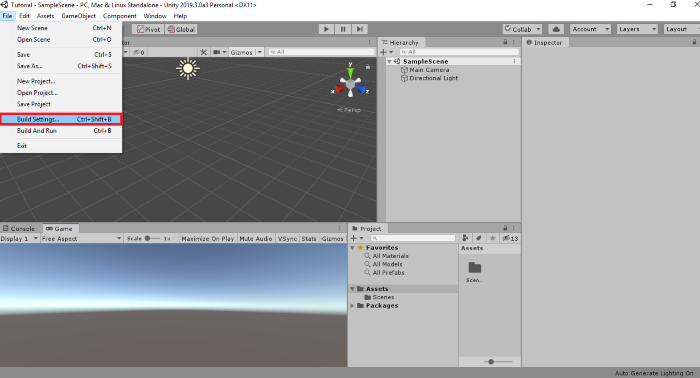
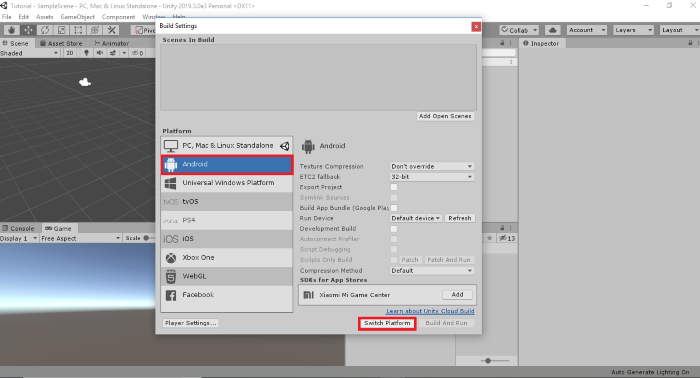
- With "Build Settings" open, click on Android and then "Switch Platform". If you do not have the Android extension installed, an option to download it will appear, after which you can follow the steps above.
Next Steps:
When the selected image is shown as the target, the final animation result appears through your computer's camera:
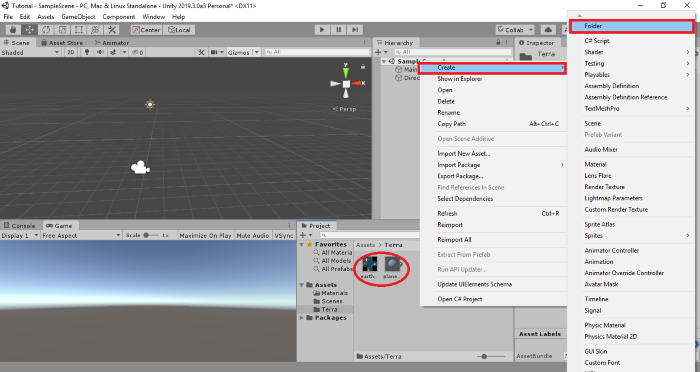
To add your 3D model in Unity, simply drag or copy the 3D file from your computer's folder into the "Project" tab in Unity. You will then be able to add it to your AR experience. If the model comes without a texture, add the texture file as well.
It is always good practice to keep the Project panel organized. When adding image files, audio, or 3D objects, create separate folders so you don't lose track of your assets. To create a folder, right-click in the Project panel and select "Create > Folder".
After downloading from the Asset Store or importing your animation into Unity, the process is essentially the same: simply drag the object inside the "Image Target" and test it using your computer's camera through Play Mode.
AR with an Image Sequence
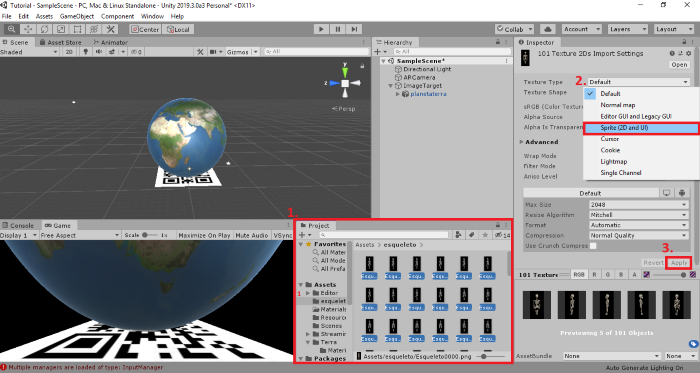
You can also produce augmented reality using an image sequence. If you have an image sequence derived from a 3D animation, go to "Project" and create a specific folder for the sequence. You can click and drag or copy those images into Unity (1.). After exporting the images, select all of them, change the option to "Sprite" (2.), and click "Apply" (3.).
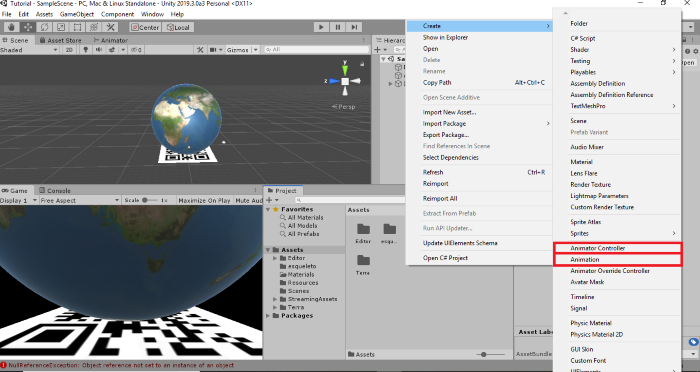
Outside the image sequence folder, still in the Project panel, right-click and under "Create", create an "Animator Controller" and an "Animation". These components will allow you to play back your image sequence, generating an animation.
Add a new "Image Target" or remove the 3D model and reuse the existing one. To add new images and have more than one AR experience, you must go to Vuforia, access your database, and add a new image the same way the first one was added. Then simply download and import it again.
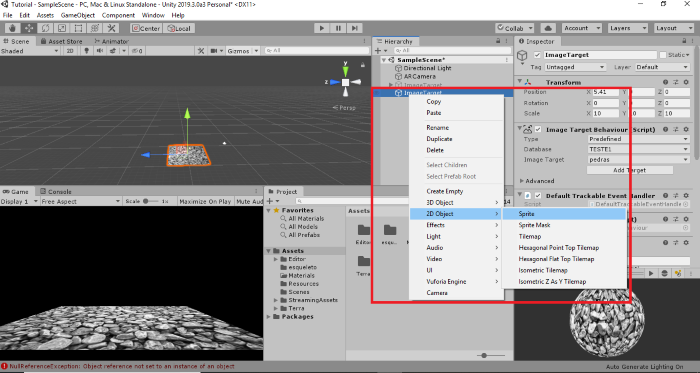
After configuring the image, inside the "Hierarchy" tab, click on the Image Target and create a sprite.
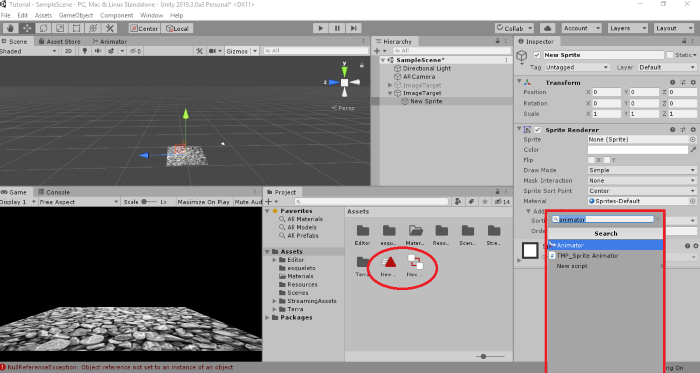
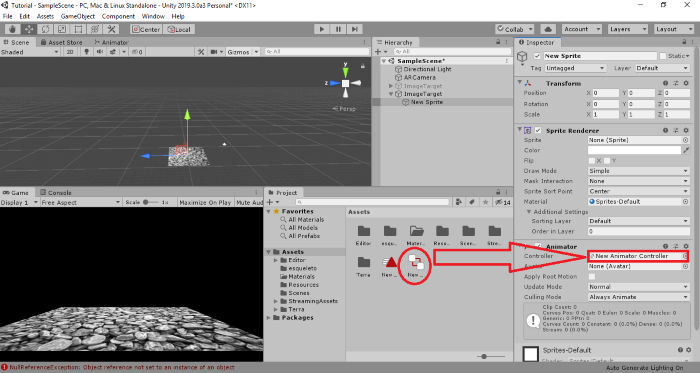
Inside that sprite, go to "Add Component", search for and add the "Animator", then drag the "Animator Controller" you created into the "Controller" field.
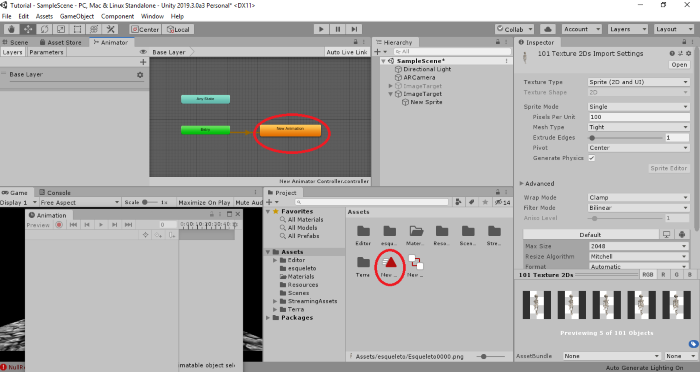
Open an "Animator" tab and drag the Animation you created into it.
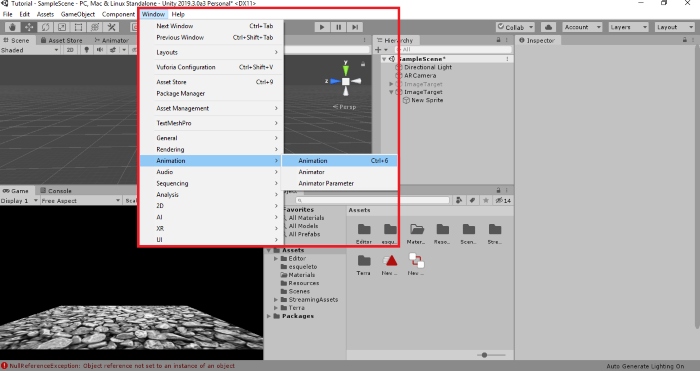
Go to Window and add the "Animation" and "Animator" tabs. If any of the tabs mentioned throughout this tutorial are not active in your Unity, you can easily find them through the same menu: Window.
With the Animator tab open, click on your Animator Controller — this will open the animation layers. Then add the Animation item you created by selecting and dragging it in.
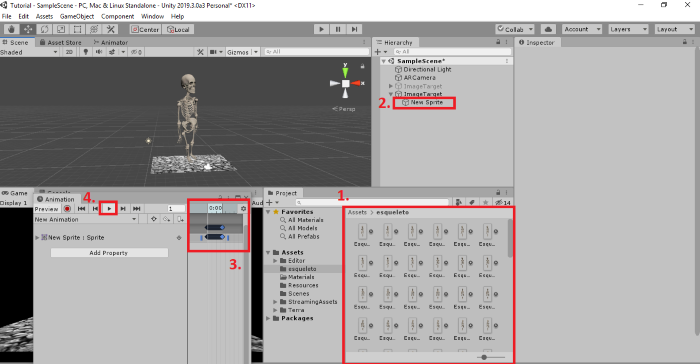
Go into the folder containing your image sequence (1.), click on "New Sprite" (the component inside the Image Target) (2.), select all images in your sequence and drag them into the Animation tab (3.), then press Play in that same tab — the animation should appear in the scene (4.).
AR with a URL
It is also possible to produce AR using URL-based videos. If you have a video with a URL, or a server where you can upload a video and obtain a URL to add to the application, the app will use the internet to play the video rather than consuming device storage. This mode does not work with videos hosted on platforms such as Youtube or Facebook — to play a URL, you need a direct link containing only the video file and an active internet connection.
Add an "Image Target", select it by clicking on it, then right-click and go to "3D Object > Plane".
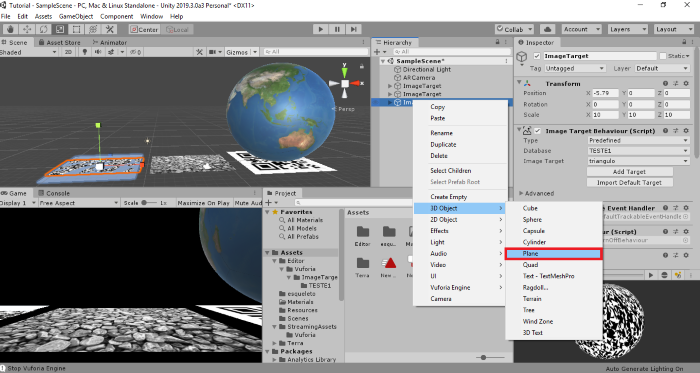
With the Plane added to the Image Target, click on it, go to "Add Component", search for "Video Player", and select it.
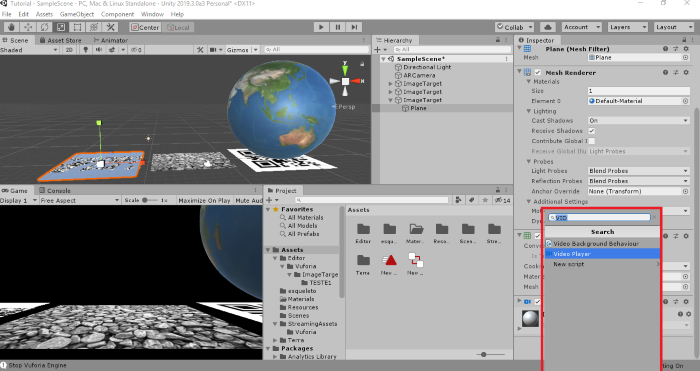
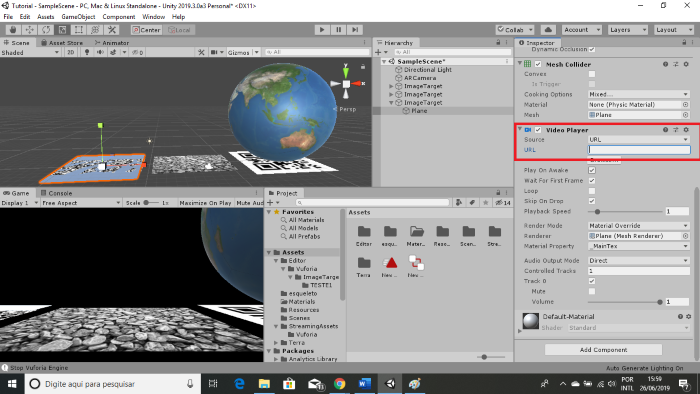
In the Video Player located inside the Plane, change the "Source" option from Video Clip to URL, and enter your video link. After this, your video will play whenever the camera scans the target image.
AR on Android
To create an APK (the file format for Android apps), you need an SDK — a software development kit for Android that communicates with Unity, providing the data and tools needed to build the app. In this case, we will use Android Studio, which is the most widely used program for developing Android apps.
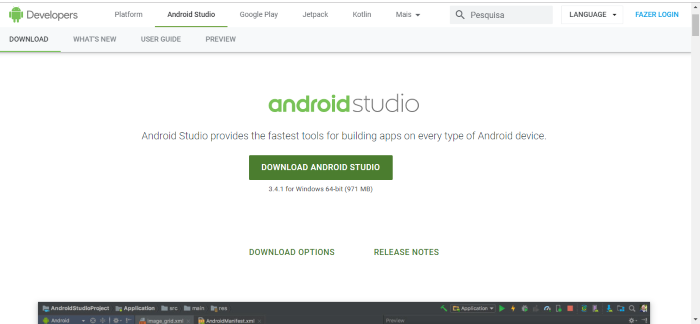
You only need to download and install the program on your computer. However, there are some important details to check during installation. The program cannot be installed in folders whose names contain accented characters. Also, take note of the installation path — this will be the root folder of your SDK, and you may need to reference it later.
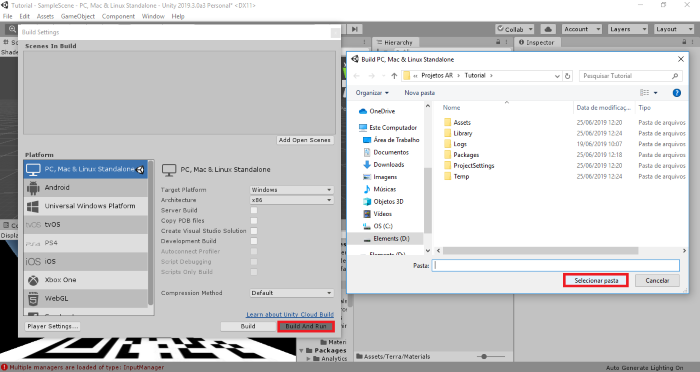
With an Android device, you can test your augmented reality directly on the phone by connecting it via USB and enabling USB debugging in your settings. Then, in Unity, go to "File > Build Settings > Build and Run", select the name and destination folder for the file, and click Save. Unity will perform the build, and once complete, the app will be installed on your device.
Apple has more stringent requirements for iOS devices (iPhones and iPads). To test on them, you need an Apple developer account and a Macbook or iMac.
Common Errors Encountered During the Process
- Incomplete build — SDK not found: When performing a build, Unity may begin loading the APK normally, but after some time a warning such as "SDK not found" may appear and the build will not complete. If this occurs, Unity will provide an option to specify the location of your SDK — the folder where it was installed. Simply locate the folder and the issue will be resolved.
- 3D Object Added Without Texture: If you import a 3D project into Unity and it appears without a texture, add the texture images separately. You can drag them into Unity and then apply them once the object is in the scene (by dragging from the Project tab to the Hierarchy).
- Device Not Found: Simply connecting your Android device via USB is not enough to test your APK. If Unity cannot find your device, check in your settings that you have enabled both Developer Options and USB Debugging.
If you have not enabled them, the process is straightforward. On more recent versions of Android, there is a specific button in the settings called "Developer Options" — click it, enable the option, and scroll down slightly to find "USB Debugging" and enable that as well. A confirmation dialog will appear; press OK.
On some older Android versions, go to Settings, then Applications, then "Development", and enable USB Debugging.
If you cannot find either of those options, go to Settings, then "About Device", and tap the Build Number / Version Number seven times. Return to Settings, select Developer Options, enable it, and then enable USB Debugging.
This process can be undone by disabling USB Debugging on your device, or you can revoke authorization for specific computers you no longer wish to allow.
- AR animation appears without scanning the image, or does not appear at all: If you are testing your AR in "Play Mode" (the tool located at the top center of Unity, represented by a play icon) and the animation appears without reading the target image — showing up in your camera feed at all times — the solution is to go to the "Hierarchy" tab and place the animation inside the Image Target you created. This way, the animation will only appear when the target image is detected.
In another scenario with the same root cause but the opposite result — the animation not appearing when the camera scans the image — check again that the animation is placed inside the Image Target.
- URL not working: Did you choose to produce AR with a URL-based video but the video does not appear when scanning the image? First, check that you have a good internet connection. Then verify the link you are using — the link must point directly to a video file, and that video must be in a format supported by Unity. Supported video formats are: MOV, AVI, ASF, MPG, MPEG, MP4.
- Error "Location contains non ASCII characters": If at any point during installation or development you receive an error message similar to this, it means the location of the program, project, or file contains non-standard characters such as accented letters, periods, or symbols. With that in mind, try changing the path of the item in question or renaming the folder.
- Docs: The programs used to produce AR come with a kind of instruction manual that you can consult if you have questions or encounter an error you cannot resolve. These are the well-known DOCS, which you can find on each program's website or by accessing the links below:
Unity: https://docs.unity3d.com/Manual/index.html
Android Studio: https://developer.android.com/docs
Vuforia: https://library.vuforia.com/getting-started/overview.html